How To Read A Guitar Chord Diagram
Learning how to read a guitar chord diagram is pretty easy once you know what you are looking at. Chord diagrams are used all over the place including music books that you might buy to learn your favorite songs. Most guitar teachers use chord diagrams throughout their guitar lessons, so it is a good idea to make sure you know exactly how to read one.
A chord diagram looks like the frets and strings on your guitar. The blocks or square represent your guitar frets, while the vertical lines running up and down represent your different strings. The thickest string will be all the way to your left, while the thinnest string will be all the way to your right.

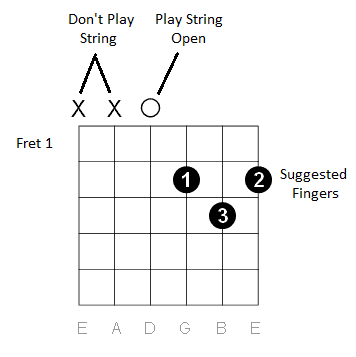
You will notice that there are different markings on the chord diagram. The black dots with the numbers represent where you will place your fingers and what finger to use.
For example, in the diagram to the right, you would place your first finger on the 3rd string (G) of the 2nd fret.
The “O” at the top means that you play that string open. Remember, playing a string open means no finger is fretting the guitar string. In the diagram above, string 4 (D) will be played open.
The “X” at the top means that you do not play that string. In the diagram above, strings 5 and 6 (E and A) will not be played.
Watch the video below for a more detailed explanation.
